Go Back
ciabatta — Mediterranean Diet Hub

ciabatta

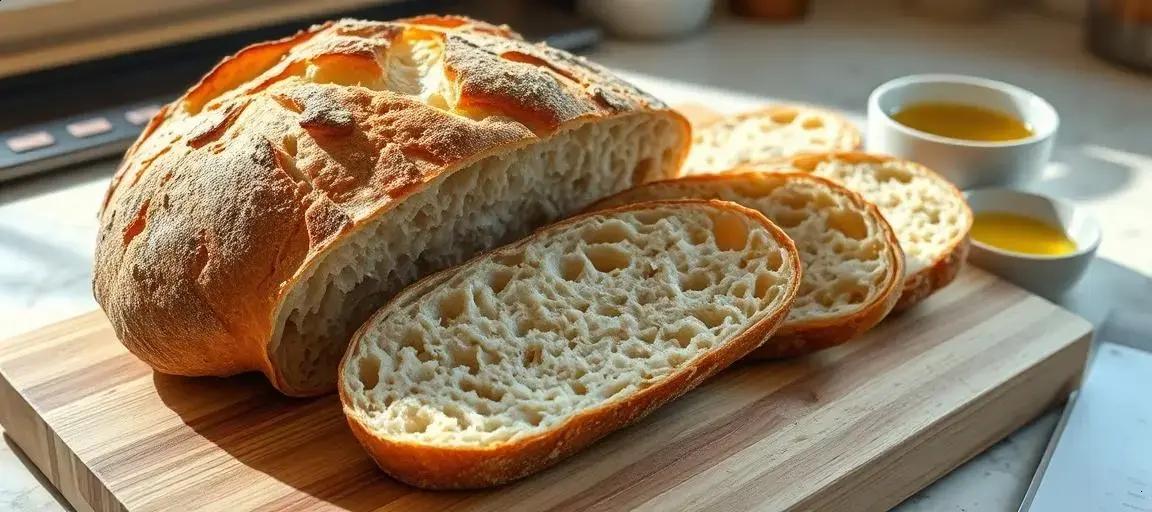
Ciabatta bread made at home, with a chewy crumb and crisp crust. No-knead dough, 10 minutes active time. Step-by-step for bakery-style results.
Total Time 4 hours 1 minute
Servings: 8 slices
Course: Bread
Cuisine: Italian
Calories: 160

Ingredients
  

dough
  • 3.5 cups all-purpose flour
  • 1.5 cups water room temperature
  • 1 teaspoon salt
  • 0.5 teaspoon instant yeast
  • 1 tablespoon olive oil

Method
 

  1. In a large bowl, combine the flour, salt, and instant yeast. Give it a good stir with your hand or a fork—just enough so the yeast touches flour, not clumps of salt alone.
  2. Add the water and olive oil. Mix with a sturdy spoon or your hand until no dry flour remains. The dough will look sticky and shaggy. That’s right—do not knead.
  3. Cover the bowl with plastic wrap or a plate. Let it rest at room temperature for 14–16 hours (overnight works) until it looks bubbly and puffy. In warm weather, check it sooner after 12 hours.
  4. Scrape the dough onto a well-floured surface. Dust your hands with flour. It’s wet, so don’t worry about shaping it perfectly; gently pat it into a rough rectangle.
  5. With a bench scraper or big knife, cut the dough in half to make two loaves. Dimple the surface gently with your fingers.
  6. Transfer the dough to parchment paper or a baking sheet. Cover lightly with a clean kitchen towel. Let it rise for 40–60 minutes; it will puff up a bit but might spread more than rise (normal for ciabatta).
  7. About 30 minutes before baking, set your oven to 475°F (245°C). Place a pizza stone or heavy baking sheet inside to heat up.
  8. Carefully slide the parchment (and dough) onto the hot stone or baking sheet. Bake 18–22 minutes until the loaves are deep golden and sound hollow when tapped underneath.
  9. Let cool at least 20 minutes before cutting. Slicing too soon makes the inside gummy.

Notes

The first time I made ciabatta at home, I realized why bakeries let their loaves look so wild. This dough is sticky, unruly, and honestly much less work than most breads once you accept the mess. The hydration is what gives you that classic open crumb—just don’t expect it to behave like sandwich bread.

Tips from my kitchen

Don’t knead this dough. Every instinct (and some recipe books) will tell you to add flour and knead until smooth, but if you do, you’ll lose the airy holes. The dough should feel wet and almost pourable after mixing—use a bench scraper if you have one, or lots of flour on your hands if not.
If you want that golden, crackly crust, steam is your friend. Right as you put the dough in, toss a handful of ice cubes into a small metal pan on the oven floor (never glass). The burst of steam helps set the crust before the loaf dries out.
I always wait a full 20 minutes before slicing. The inside needs time to finish setting. Fresh out of the oven, it can feel sticky or look slightly underbaked—it's not. Once cooled, the crumb is chewy but not wet.

Variations and swaps that do work

If you’re out of all-purpose flour, a mix of up to 25% bread flour adds extra chew. More than that and the dough can get too stiff for those big holes. I wouldn’t use whole wheat here unless you’re okay with a denser, less traditional loaf—start by swapping in just 1/2 cup and see how you like it.

Storage and make-ahead

Leftover slices freeze surprisingly well. I lay them flat in a bag; to thaw, pop straight in the toaster (no thawing needed). If the crust softens, re-crisp in a hot oven for five minutes. This bread’s best the day it’s baked, but day-old slices do magic in paninis or panzanella salad.